Removing Light Pollution in Astrophotography Post-Processing can be a game changer for your stargazing snaps. Ever noticed those annoying bright patches ruining your night sky photos? You’re not alone! In this guide, we’ll dive into what causes light pollution, how it messes with your images, and why getting rid of it is essential. Plus, you’ll discover the best tools and techniques to bring out the true beauty of the cosmos. Say goodbye to those hazy, washed-out photos and hello to stunning celestial wonders! Let’s jump in.
Main Points
- Use editing software to adjust contrast and brightness.
- Apply noise reduction tools to clear up the image.
- Subtract light pollution with gradient removal techniques.
- Use color balance to get rid of yellow and orange tints.
- Crop your image to focus on the best parts and avoid pollution.

Understanding Light Pollution in Astrophotography
What Causes Light Pollution
Light pollution is the bane of every astrophotographer’s existence. Imagine you’re out in the countryside, telescope set, camera ready, and the night sky sprawled out before you. Then you notice a faint, unwanted glow creeping into your frame. That’s light pollution. It’s caused by artificial lights from urban areas, street lamps, buildings, and even car headlights.
This unwanted light scatters in the atmosphere, creating a sky glow that masks the stars and celestial objects you want to capture. The more populated the area, the worse the light pollution. Even if you’re miles away from a city, the glow can still reach you. This is why many astrophotographers seek out remote locations, far from human-made light sources.
Effects of Light Pollution on Your Photos
Light pollution doesn’t just affect your view of the night sky; it can ruin your photos. When you’re capturing long exposures, which is often necessary in astrophotography, any stray light can wash out the details of your images. Instead of a crisp, clear shot of the Milky Way, you end up with a hazy, washed-out mess.
Heres a quick comparison to help you understand the impact:
| Aspect | Without Light Pollution | With Light Pollution |
|---|---|---|
| Star Visibility | High | Low |
| Image Clarity | Sharp | Blurry |
| Color Accuracy | True to life | Distorted |
| Detail Level | High | Low |
Why Removing Light Pollution Matters
Removing light pollution from your astrophotography images is crucial if you want to capture the night sky in all its glory. It’s like cleaning a dirty window to get a clearer view. By reducing or eliminating light pollution, you can reveal the true colors and details of celestial objects.
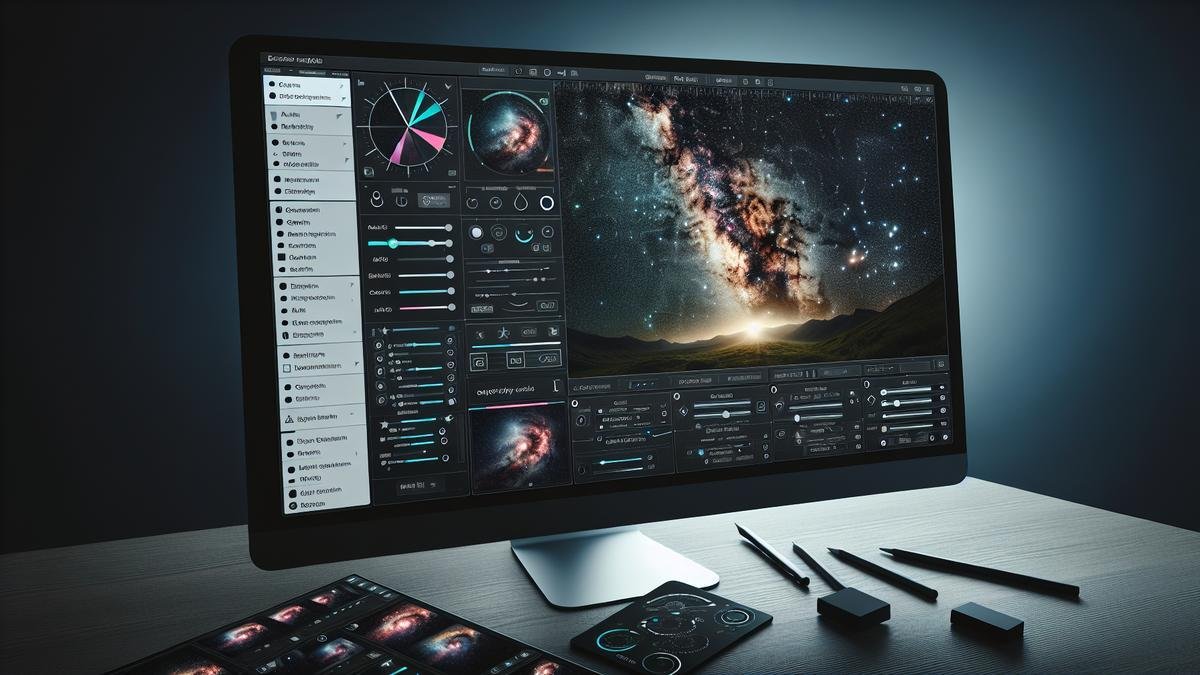
Tools You Need for Post-Processing
You’re diving into the fascinating world of astrophotography, and now it’s time to polish those stunning celestial captures. Post-processing is where the magic happens, transforming your raw images into breathtaking masterpieces. But to do this effectively, you’ll need the right tools. Let’s explore what you need to get started.
Best Software for Removing Light Pollution
Light pollution is the bane of every astrophotographer’s existence. It washes out the vibrant colors and intricate details of the night sky. Fortunately, several software options can help you combat this issue.
Here’s a table highlighting some of the best software for removing light pollution:
| Software | Features | Price |
|---|---|---|
| Adobe Photoshop | Advanced editing tools, layers, and masks | Subscription |
| PixInsight | Specialized astrophotography tools, dynamic background extraction | Paid |
| DeepSkyStacker | Stacking capabilities, free to use | Free |
| Lightroom | User-friendly interface, excellent for basic adjustments | Subscription |
| GIMP | Open-source, versatile editing tools | Free |
Adobe Photoshop and PixInsight are top-tier choices for serious astrophotographers. Photoshop offers a broad range of tools, including layers and masks, which are crucial for intricate editing. PixInsight, on the other hand, is tailored specifically for astrophotography, providing specialized tools like dynamic background extraction, which is fantastic for removing light pollution.
For those on a budget, DeepSkyStacker and GIMP are excellent alternatives. DeepSkyStacker is particularly useful for stacking multiple exposures to reduce noise and enhance detail. GIMP, while not as powerful as Photoshop, offers a wide range of editing tools and is completely free.
Essential Plugins and Filters
Plugins and filters can significantly enhance your post-processing workflow, making it easier to achieve professional-quality results. Here are some essential plugins and filters you should consider:
| Plugin/Filter | Function | Compatible Software |
|---|---|---|
| GradientXTerminator | Removes gradients caused by light pollution | Photoshop |
| StarNet++ | Separates stars from the background | PixInsight, Photoshop |
| AstroFlat Pro | Flattens uneven backgrounds | Photoshop, Lightroom |
| Nik Collection | Offers a suite of creative filters | Photoshop, Lightroom |
| Astronomy Tools Actions | Provides various astrophotography actions | Photoshop |
GradientXTerminator is a lifesaver for dealing with gradients caused by light pollution. It works seamlessly with Photoshop and can dramatically improve your images. StarNet++ is another powerful tool, allowing you to separate stars from the background, making it easier to process different elements of your image independently.
AstroFlat Pro is excellent for flattening uneven backgrounds, which is a common issue in astrophotography. And if you’re looking to add some creative flair to your images, the Nik Collection offers a suite of filters that can enhance your photos in various ways.

Step-by-Step Guide to Removing Light Pollution
Hey there, fellow stargazer! So, you’ve captured some stunning shots of the night sky, but there’s this pesky light pollution messing up your masterpiece. Don’t worry, I’ve got your back. Let’s dive into how you can remove that unwanted light pollution during post-processing.
Pre-Processing Tips
Before we jump into the nitty-gritty of post-processing, let’s talk about some pre-processing tips. These steps will make your life a whole lot easier when you’re dealing with light pollution later on.
Shoot in RAW Format
Always shoot in RAW format. This gives you the most data to work with when you’re editing your photos. JPEGs just won’t cut it here.
Use a Tripod
A sturdy tripod is your best friend. It keeps your camera stable, which is crucial for long exposures. If you need recommendations, you might want to check out some tripods for astrophotography.
Choose the Right Lens
The lens you use can make a big difference. Wide-angle lenses are generally the go-to for astrophotography. For more insights, take a look at essential lenses for capturing the night sky.
Use Filters
Consider using light pollution filters. These can help reduce the amount of artificial light that hits your sensor. For a deeper dive, check out the best filters for enhancing your astrophotography shots.
Detailed Post-Processing Steps
Alright, you’ve got your RAW images, your tripod was rock solid, and your lens was on point. Now, let’s get to the fun part—post-processing!
Step 1: Import Your Images
First things first, import your RAW images into your editing software. Lightroom and Photoshop are popular choices. If you’re new to Lightroom, you might find this beginner’s guide useful.
Step 2: Adjust White Balance
Set the white balance to a neutral tone. This helps in reducing any color cast caused by light pollution.
Step 3: Reduce Noise
Use the noise reduction tools in your software. Light pollution often introduces noise, so this step is crucial.
| Noise Reduction Tips | Description |
|---|---|
| Luminance | Reduces grainy look |
| Color | Reduces color noise |
| Detail | Retains sharpness |
Step 4: Use Gradient Filters
Apply gradient filters to the areas affected by light pollution. This allows you to darken those areas without affecting the rest of the image.
Step 5: Adjust Levels and Curves
Tweak the levels and curves to enhance the contrast between the stars and the sky. This helps in making the stars pop while reducing the impact of light pollution.
Step 6: Fine-Tune Exposure
Adjust the exposure to bring out the details in the darker areas of your image. Be careful not to overexpose the stars.
Step 7: Use the Clone Stamp Tool
If there are still stubborn spots of light pollution, use the clone stamp tool to manually remove them. This is a bit tedious, but it can make a big difference.
Step 8: Color Correction
Finally, use color correction tools to balance the overall color of your image. This helps in making the stars appear more natural.
| Color Correction Tips | Description |
|---|---|
| Temperature | Adjusts the warmth or coolness |
| Tint | Balances green and magenta tones |
| Saturation | Enhances or reduces overall color |
Common Mistakes to Avoid
Even the best of us can make mistakes. Here are some common pitfalls to watch out for:
Over-Editing
It’s easy to go overboard with the editing tools. Remember, less is often more. Over-editing can make your image look unnatural.
Ignoring Noise
Don’t ignore the noise. Light pollution introduces a lot of noise, and failing to address this can ruin your image.
Not Using Masks
Masks are your friends. They allow you to apply adjustments to specific areas without affecting the whole image.
Enhancing Image Quality After Light Pollution Removal
So, you’ve captured a stunning image of the night sky, but there’s one pesky problem: light pollution. Fear not! Post-processing can help you remove that unwanted glow and bring out the true beauty of your astrophotography. Let’s dive into the steps to enhance your image quality after removing light pollution.
Adjusting Brightness and Contrast
Once light pollution is removed, your image might look a bit flat. Adjusting brightness and contrast can help bring back the depth and vibrancy. Start by tweaking the brightness to make the stars pop.
Brightness Adjustment:
| Step | Action |
|---|---|
| 1 | Open your image in your preferred editing software. |
| 2 | Locate the brightness adjustment tool. |
| 3 | Increase or decrease the brightness until the stars are more visible. |
Next, adjust the contrast to enhance the differences between the dark sky and the bright stars.
Contrast Adjustment:
| Step | Action |
|---|---|
| 1 | Find the contrast adjustment tool in your software. |
| 2 | Increase the contrast to make the stars stand out against the dark sky. |
| 3 | Be careful not to overdo it, as too much contrast can make the image look unnatural. |
Fine-Tuning Colors
After adjusting brightness and contrast, it’s time to fine-tune the colors. Light pollution can sometimes leave a color cast on your image, making the sky look unnatural. Correcting this can make a big difference.
Color Correction:
| Step | Action |
|---|---|
| 1 | Use the color balance tool in your editing software. |
| 2 | Adjust the sliders for red, green, and blue to remove any unwanted color casts. |
| 3 | Aim for a natural-looking sky, with stars appearing white or slightly colored. |
If you’re looking for more tips on enhancing star colors, check out this guide on techniques for enhancing star colors in astrophotography.

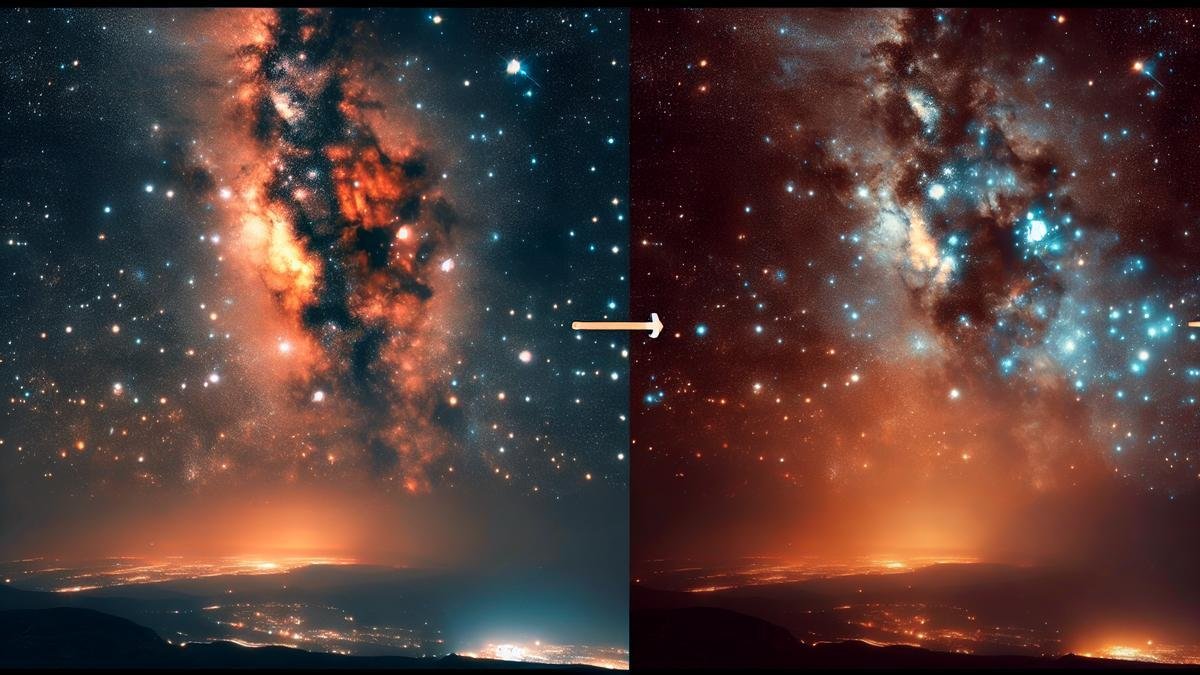
Comparing Before and After Results
Visual Differences
When you first capture an image of the night sky, it often appears washed out due to light pollution. This can be quite frustrating, especially when you know the stars and galaxies are out there, hidden beneath that haze. But don’t worry, with some post-processing magic, you can bring those celestial bodies to life.
Let’s take a closer look at the visual differences between a raw image and one that has been processed to remove light pollution. Imagine you have a photo of the Milky Way. In the raw image, the sky might look grayish with a few faint stars. After processing, the sky becomes a deep black canvas dotted with bright, twinkling stars.
Here’s a table to summarize the key visual differences:
| Aspect | Raw Image | Processed Image |
|---|---|---|
| Sky Color | Grayish, washed out | Deep black, rich in contrast |
| Star Visibility | Few stars, faint | Many stars, bright and clear |
| Detail | Blurry, low detail | Sharp, high detail |
| Overall Look | Dull, uninspiring | Vibrant, captivating |
Analyzing Improvements
Now that you’ve seen the visual differences, let’s dive into analyzing improvements. Post-processing isn’t just about making the sky look darker; it’s about enhancing every element of your image.
- Contrast and Brightness: By adjusting the contrast and brightness, you can make the stars pop against the dark sky. This makes the image more dynamic and engaging.
- Noise Reduction: Light pollution often introduces noise into your photos. Using noise reduction techniques, you can smooth out the image, making the stars stand out more clearly.
- Color Balance: Light pollution can also affect the color balance of your photos. By tweaking the colors, you can bring out the natural hues of the stars and nebulae.
Here’s another table to highlight these improvements:
| Improvement Area | Raw Image Issues | Post-Processing Benefits |
|---|---|---|
| Contrast & Brightness | Low contrast, dim stars | High contrast, bright stars |
| Noise Reduction | High noise, grainy appearance | Smooth image, clear stars |
| Color Balance | Unnatural colors due to pollution | Natural hues, true star colors |
Advanced Techniques for Expert Results
When you’re deep into astrophotography, removing light pollution becomes crucial. Light pollution can wash out the stars, leaving your images lackluster. Let’s dive into some advanced techniques to help you achieve expert results.
Layer Masking Techniques
Layer masking is a powerful tool in your post-processing arsenal. It allows you to selectively apply adjustments to specific areas of your image.
Steps to Use Layer Masking:
- Open Your Image in Photoshop: Start by opening your astrophotography image in Photoshop.
- Create a New Adjustment Layer: Go to the ‘Layer’ menu, select ‘New Adjustment Layer,’ and choose ‘Levels.’
- Adjust Levels: Slide the black and white points to increase the contrast. This will help to bring out the stars.
- Add a Mask: Click on the mask icon to add a mask to your adjustment layer.
- Paint on the Mask: Use a soft brush to paint black on the areas where you dont want the adjustment to apply. This will hide the adjustment in those areas.
Layer masking allows for precise control, enabling you to enhance the stars while minimizing the impact of light pollution.
Using Gradient Filters
Gradient filters are another effective tool for reducing light pollution. They allow you to apply a gradual adjustment across your image.
Steps to Use Gradient Filters:
- Open Your Image in Lightroom: Start by opening your image in Lightroom.
- Select the Gradient Filter Tool: Click on the gradient filter icon in the toolbar.
- Draw the Gradient: Click and drag to draw a gradient across your image. The area where you start the drag will receive the full effect, which will gradually diminish towards the end of the drag.
- Adjust the Settings: Use the sliders to adjust exposure, contrast, and other settings. This will help to balance the light pollution with the rest of your image.
Gradient filters are particularly useful for images with uneven light pollution, such as those taken near city lights.
Combining Multiple Exposures
Combining multiple exposures is a technique that can significantly improve your astrophotography images. By stacking multiple exposures, you can reduce noise and enhance details.
Steps to Combine Multiple Exposures:
- Capture Multiple Exposures: Take several exposures of the same scene. Aim for at least 10-15 shots.
- Align the Images: Use software like DeepSkyStacker to align the images. This ensures that the stars line up perfectly.
- Stack the Images: Stack the aligned images to combine the data. This will increase the signal-to-noise ratio, resulting in a cleaner image.
- Post-Process the Stacked Image: Use Photoshop or Lightroom to further enhance the image. Adjust levels, curves, and apply noise reduction as needed.
Combining multiple exposures is a game-changer, allowing you to capture stunning details that would be impossible with a single shot.
Removing Light Pollution in Astrophotography Post-Processing
Light pollution can be a significant hurdle in astrophotography. However, with the right techniques, you can minimize its impact and bring out the beauty of the night sky.
Using the Right Tools
- Photoshop: Photoshop is a powerful tool for astrophotography post-processing. Use adjustment layers, masks, and curves to fine-tune your images.
- Lightroom: Lightroom offers a range of tools for adjusting exposure, contrast, and color balance. Use gradient filters and local adjustments to target specific areas.
- DeepSkyStacker: DeepSkyStacker is essential for aligning and stacking multiple exposures. This reduces noise and enhances details.
Practical Tips
- Shoot in RAW: Always shoot in RAW format. This gives you more data to work with and allows for more flexibility in post-processing.
- Use a Tripod: A sturdy tripod is essential for capturing sharp images. Check out this guide on tripods for astrophotography for more information.
- Choose the Right Lens: The lens you use can make a big difference. Learn about the essential lenses for capturing the night sky.
Advanced Techniques
- Layer Masking: Use layer masking to selectively apply adjustments. This allows you to enhance the stars while minimizing light pollution.
- Gradient Filters: Apply gradient filters to balance light pollution with the rest of your image.
- Combining Exposures: Stack multiple exposures to reduce noise and enhance details.
Layer Masking Techniques
Layer masking is a technique that allows you to apply adjustments to specific parts of your image without affecting the entire image. This is particularly useful in astrophotography, where you may want to enhance the stars while minimizing light pollution.
Steps to Use Layer Masking:
- Open Your Image in Photoshop: Start by opening your astrophotography image in Photoshop.
- Create a New Adjustment Layer: Go to the ‘Layer’ menu, select ‘New Adjustment Layer,’ and choose ‘Levels.’
- Adjust Levels: Slide the black and white points to increase the contrast. This will help to bring out the stars.
- Add a Mask: Click on the mask icon to add a mask to your adjustment layer.
- Paint on the Mask: Use a soft brush to paint black on the areas where you dont want the adjustment to apply. This will hide the adjustment in those areas.
Layer masking allows for precise control, enabling you to enhance the stars while minimizing the impact of light pollution.
Using Gradient Filters
Gradient filters are another effective tool for reducing light pollution. They allow you to apply a gradual adjustment across your image.
Steps to Use Gradient Filters:
- Open Your Image in Lightroom: Start by opening your image in Lightroom.
- Select the Gradient Filter Tool: Click on the gradient filter icon in the toolbar.
- Draw the Gradient: Click and drag to draw a gradient across your image. The area where you start the drag will receive the full effect, which will gradually diminish towards the end of the drag.
- Adjust the Settings: Use the sliders to adjust exposure, contrast, and other settings. This will help to balance the light pollution with the rest of your image.
Gradient filters are particularly useful for images with uneven light pollution, such as those taken near city lights.
Combining Multiple Exposures
Combining multiple exposures is a technique that can significantly improve your astrophotography images. By stacking multiple exposures, you can reduce noise and enhance details.
Steps to Combine Multiple Exposures:
- Capture Multiple Exposures: Take several exposures of the same scene. Aim for at least 10-15 shots.
- Align the Images: Use software like DeepSkyStacker to align the images. This ensures that the stars line up perfectly.
- Stack the Images: Stack the aligned images to combine the data. This will increase the signal-to-noise ratio, resulting in a cleaner image.
- Post-Process the Stacked Image: Use Photoshop or Lightroom to further enhance the image. Adjust levels, curves, and apply noise reduction as needed.
Combining multiple exposures is a game-changer, allowing you to capture stunning details that would be impossible with a single shot.
Removing Light Pollution in Astrophotography Post-Processing
Light pollution can be a significant hurdle in astrophotography. However, with the right techniques, you can minimize its impact and bring out the beauty of the night sky.
Using the Right Tools
- Photoshop: Photoshop is a powerful tool for astrophotography post-processing. Use adjustment layers, masks, and curves to fine-tune your images.
- Lightroom: Lightroom offers a range of tools for adjusting exposure, contrast, and color balance. Use gradient filters and local adjustments to target specific areas.
- DeepSkyStacker: DeepSkyStacker is essential for aligning and stacking multiple exposures. This reduces noise and enhances details.
Practical Tips
- Shoot in RAW: Always shoot in RAW format. This gives you more data to work with and allows for more flexibility in post-processing.
- Use a Tripod: A sturdy tripod is essential for capturing sharp images. Check out this guide on tripods for astrophotography for more information.
- Choose the Right Lens: The lens you use can make a big difference. Learn about the essential lenses for capturing the night sky.
Frequently asked questions
How do you start removing light pollution in astrophotography post-processing?
Start by using a gradient removal tool in your photo editing software. Tools like Photoshop and GIMP are popular choices for this.
Which software works best for removing light pollution in astrophotography post-processing?
Adobe Photoshop and Lightroom are excellent. But free options like GIMP work just as well.
Can you use filters to reduce light pollution before post-processing?
Yes, using light pollution filters while shooting can make post-processing easier. These filters block unwanted artificial light.
Do you need special plugins for removing light pollution in astrophotography post-processing?
Plugins like Astro Panel and HLVG can help. Theyre great for reducing gradients and enhancing details.
Whats the biggest challenge in removing light pollution in astrophotography post-processing?
The biggest challenge is keeping the natural colors and details of the stars and galaxies while removing unwanted light. Balance is key.