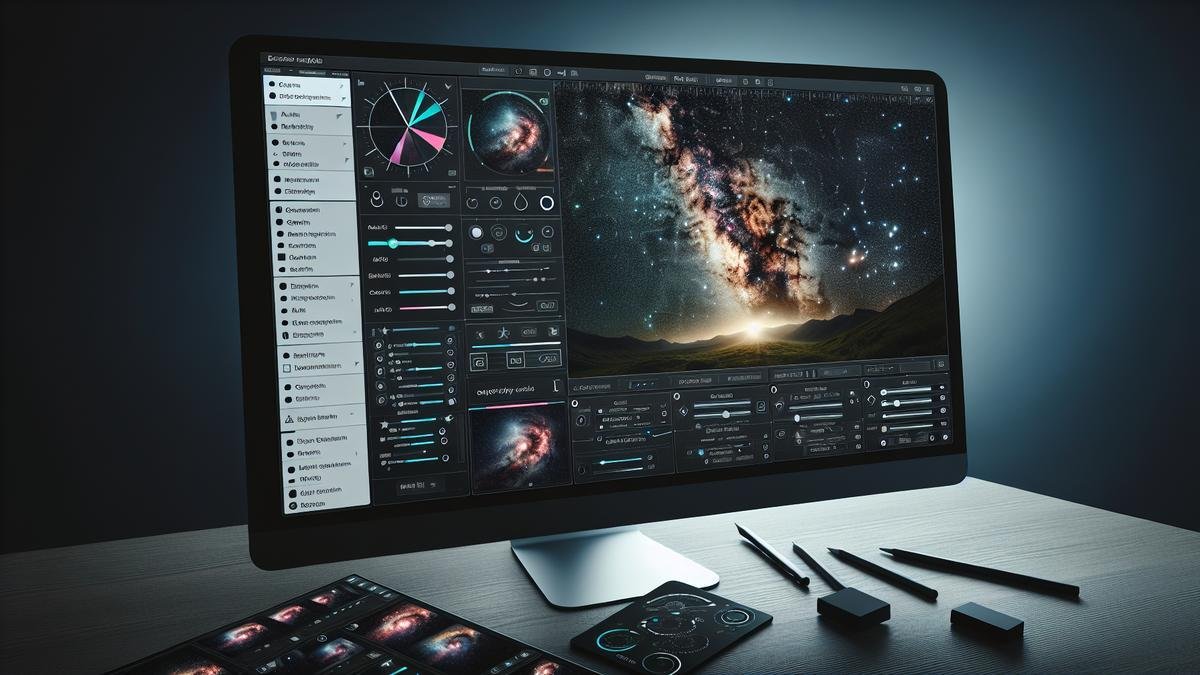
Noise Reduction Techniques for Orions Belt
Understanding Noise in Astrophotography
When you capture the night sky, especially something as stunning as Orions Belt, you might notice some unwanted speckles or graininess in your photos. This is what we call “noise.” Noise can be caused by several factors, such as high ISO settings, long exposure times, or even the camera sensor itself. Imagine noise as the static you hear on a radio when it’s not tuned properly. In your photos, this static can make the stars and nebulas look blurry and less vibrant.
To get the best out of your Orions Belt shots, you need to understand the different types of noise:
Types of Noise:
| Noise Type | Description |
|---|---|
| Luminance Noise | Appears as graininess and affects the brightness of pixels. |
| Chrominance Noise | Shows up as random colored pixels and affects the color accuracy. |
| Fixed Pattern Noise | Appears as a consistent pattern, often due to sensor defects. |
| Thermal Noise | Caused by the heat generated by the camera sensor during long exposures. |
Understanding these types of noise is the first step in reducing them and enhancing the beauty of Orions Belt in your photos.
Best Software for Noise Reduction
Now that you know what noise is, let’s talk about the tools you can use to reduce it. There are several software options available, each with its unique features and strengths.
Top Noise Reduction Software:
| Software | Key Features |
|---|---|
| Adobe Lightroom | Offers powerful noise reduction tools and easy-to-use sliders for both luminance and color noise. |
| Adobe Photoshop | Provides advanced noise reduction filters and the ability to work with layers for precise control. |
| Topaz DeNoise AI | Uses artificial intelligence to reduce noise while preserving details and textures. |
| DxO PhotoLab | Known for its excellent noise reduction algorithms and user-friendly interface. |
| Capture One | Offers professional-grade noise reduction tools and customizable settings. |
Each of these software options has its strengths, and the best one for you will depend on your specific needs and preferences. However, Adobe Lightroom and Topaz DeNoise AI are particularly popular among astrophotographers for their ease of use and powerful noise reduction capabilities.
Step-by-Step Noise Reduction Guide
Reducing noise in your Orions Belt photos can seem daunting, but with the right steps, you can achieve stunning results. Heres a step-by-step guide to help you through the process:
Step 1: Import Your Photo
Start by importing your photo into your chosen software. For this guide, we’ll use Adobe Lightroom as an example.
Step 2: Basic Adjustments
Before diving into noise reduction, make some basic adjustments to your photo. Adjust the exposure, contrast, and white balance to get a good starting point.
Step 3: Zoom In
Zoom in to at least 100% to see the noise clearly. This will help you make precise adjustments.
Step 4: Luminance Noise Reduction
Go to the Detail panel and find the Noise Reduction section. Start with the Luminance slider. Increase it gradually until the graininess starts to disappear. Be careful not to overdo it, as too much luminance noise reduction can make your photo look smooth and unnatural.
Step 5: Color Noise Reduction
Next, adjust the Color slider to reduce chrominance noise. This will help eliminate those random colored pixels. Again, increase it gradually and find a balance where the colors look natural.
Step 6: Fine-Tuning
Use the Detail and Contrast sliders to fine-tune the noise reduction. The Detail slider controls how much detail is preserved, while the Contrast slider helps maintain the contrast in your photo.
Step 7: Apply Additional Filters (Optional)
If you’re using Adobe Photoshop or another software with advanced features, you can apply additional filters for more precise control. For example, the Reduce Noise filter in Photoshop allows you to adjust strength, preserve details, and reduce color noise separately.
Step 8: Final Adjustments
After reducing noise, make any final adjustments to your photo. This could include enhancing the contrast, adjusting the colors, or sharpening the image to bring out the details in Orions Belt.
By following these steps, you’ll be able to reduce noise effectively and enhance the beauty of Orions Belt in your astrophotography.
Enhancing Orions Belt: Contrast and Color Correction
Boosting Contrast
Once you’ve tackled noise reduction, the next step is to enhance the contrast in your photo. Contrast helps to make the stars and nebulas stand out, giving your image more depth and vibrancy.
Step 1: Adjust the Contrast Slider
In Adobe Lightroom, go to the Basic panel and find the Contrast slider. Increase it gradually to enhance the difference between the dark and light areas of your photo. Be careful not to overdo it, as too much contrast can make your photo look harsh.
Step 2: Use the Tone Curve
For more precise control, use the Tone Curve. The Tone Curve allows you to adjust the brightness and contrast of specific tonal ranges in your photo. Create a slight S-curve by lifting the highlights and darkening the shadows. This will give your photo a natural and balanced contrast boost.
Correcting Star Colors
The stars in Orions Belt have distinct colors, and correcting these colors can make your photo more visually striking. Alnitak, Alnilam, and Mintaka each have unique hues that can be brought out with careful color correction.
Step 1: Identify Star Colors
Zoom in on the stars and identify their colors. Alnitak is a blue supergiant, Alnilam is a blue-white supergiant, and Mintaka is also a blue supergiant. These stars should have a blue to blue-white hue.
Step 2: Use the HSL Panel
In Adobe Lightroom, go to the HSL (Hue, Saturation, Luminance) panel. Adjust the Blue and Aqua sliders to enhance the blue tones in the stars. Increase the saturation slightly to make the colors more vibrant.
Step 3: Adjust White Balance
Fine-tune the white balance to ensure the colors look natural. If the stars appear too blue, adjust the Temperature slider towards the warmer side. If they appear too yellow, adjust it towards the cooler side.
Highlighting Surrounding Nebulosity
The Flame Nebula and the Horsehead Nebula are stunning features near Orions Belt. Highlighting these nebulas can add an extra layer of beauty to your photo.
Step 1: Use the Brush Tool
In Adobe Lightroom, select the Brush tool and increase the exposure slightly. Brush over the areas where the nebulas are located to brighten them. Be careful to keep the adjustments subtle and natural.
Step 2: Enhance the Colors
Use the HSL panel to enhance the colors of the nebulas. Increase the saturation of the Reds and Oranges for the Flame Nebula and the Magentas and Blues for the Horsehead Nebula.
Step 3: Apply a Radial Filter
Use a Radial Filter to create a vignette effect around the nebulas. This will help draw attention to them and make them stand out. Adjust the exposure, contrast, and clarity within the radial filter to enhance the nebulas further.
Balancing Brightness and Maintaining Natural Look
Balancing brightness while maintaining a natural look is crucial for creating a visually appealing photo of Orions Belt.
Step 1: Adjust Highlights and Shadows
In the Basic panel, adjust the Highlights and Shadows sliders. Lower the highlights slightly to prevent the stars from looking too bright and increase the shadows to bring out the details in the nebulas.
Step 2: Use the Clarity Slider
Increase the Clarity slider slightly to enhance the midtone contrast. This will make the stars and nebulas pop without making the photo look unnatural.
Enhancing Contrast in Orions Belt Images
Capturing the beauty of Orions Belt is a thrilling experience for any astrophotographer. However, the journey doesn’t end with just snapping the shot. Post-processing is where the magic truly happens. This guide will walk you through the steps to enhance the contrast in your Orions Belt images, making those stars pop and the surrounding nebulosity stand out.
Why Contrast Matters in Astrophotography
Contrast is crucial in astrophotography because it separates the stars from the background, making them more visible and striking. Without good contrast, your images can look flat and lifeless. When you enhance contrast, you bring out the vivid colors and sharp details of celestial objects like Alnitak, Alnilam, and Mintaka, the three stars that form Orions Belt.
Benefits of Enhancing Contrast
- Improved Visibility: Stars and nebulas become more pronounced.
- Color Depth: Richer and more vibrant hues.
- Detail Clarity: Finer details in the nebulosity and stars are clearer.
Tools to Boost Contrast Effectively
Various tools can help you enhance contrast in your astrophotography. Lets dive into some of the most effective ones.
Adobe Photoshop
Adobe Photoshop is a powerful tool for post-processing astrophotography images. Heres how you can use it to enhance contrast:
- Curves Adjustment: Go to Image > Adjustments > Curves. This tool allows you to adjust the brightness and contrast of your image by manipulating the curve.
- Levels Adjustment: Navigate to Image > Adjustments > Levels. This tool helps you adjust the shadows, midtones, and highlights, providing a more balanced contrast.
- Layer Masks: Use layer masks to apply contrast adjustments selectively to different parts of your image.
Lightroom
Lightroom is another excellent tool for enhancing contrast. Heres a quick guide:
- Basic Panel: Use the Contrast slider in the Basic panel to increase overall contrast.
- Tone Curve: The Tone Curve panel allows for more precise adjustments.
- Clarity Slider: This slider enhances midtone contrast, adding more definition to your image.
Other Tools
- GIMP: A free alternative to Photoshop, GIMP offers similar tools for contrast adjustment.
- PixInsight: Specialized for astrophotography, PixInsight provides advanced contrast enhancement tools.
Simple Contrast Adjustment Tips
Enhancing contrast doesnt have to be complicated. Here are some simple tips to get you started.
Tip 1: Start with the Basics
Begin with basic adjustments like brightness and contrast sliders. These can make a significant difference without overwhelming you with options.
Tip 2: Use Histogram
The histogram is your best friend in post-processing. It shows the distribution of tones in your image, helping you make informed adjustments.
Tip 3: Avoid Over-Processing
While its tempting to crank up the contrast, over-processing can lead to unnatural-looking images. Aim for a balance that enhances the stars and nebulosity without making them look artificial.
Tip 4: Experiment with Different Tools
Dont be afraid to experiment with different tools and settings. Each image is unique, and what works for one may not work for another.
Noise Reduction Techniques
Noise can be a major issue in astrophotography. Heres how you can reduce it effectively.
Using Photoshop
- Noise Reduction Filter: Go to Filter > Noise > Reduce Noise. Adjust the sliders to find the right balance.
- Layer Stacking: Stack multiple images to average out the noise.
Using Lightroom
- Detail Panel: Use the Noise Reduction sliders in the Detail panel.
- Luminance Slider: This slider reduces noise in the brightness levels.
Star Color Correction
Correcting star colors can make your images more realistic and visually appealing. Heres how to do it.
Using Photoshop
- Selective Color Adjustment: Go to Image > Adjustments > Selective Color. Adjust the colors to make the stars look more natural.
- Hue/Saturation Adjustment: Use the Hue/Saturation tool to fine-tune the colors.
Using Lightroom
- HSL Panel: Use the HSL (Hue, Saturation, Luminance) panel to adjust the colors of individual stars.
- White Balance: Adjust the white balance to correct the overall color tone.
Highlighting Surrounding Nebulosity
Orions Belt is surrounded by stunning nebulas like the Flame Nebula and the Horsehead Nebula. Heres how to make them stand out.
Using Photoshop
- Layer Masks: Use layer masks to apply adjustments selectively to the nebulosity.
- Dodge and Burn: Use the Dodge and Burn tools to enhance the highlights and shadows.
Using Lightroom
- Radial Filter: Use the Radial Filter to apply adjustments to specific areas.
- Brush Tool: The Brush tool allows for precise adjustments.
Balancing Brightness
Balancing brightness is key to maintaining the natural look of your stars while making the image more visually striking.
Using Photoshop
- Brightness/Contrast Adjustment: Go to Image > Adjustments > Brightness/Contrast.
- Exposure Adjustment: Use the Exposure tool to fine-tune the brightness.
Using Lightroom
- Basic Panel: Use the Exposure and Brightness sliders in the Basic panel.
- Graduated Filter: The Graduated Filter helps balance brightness across different parts of the image.

Unlock the Beauty of Orions Belt: Post-Processing Tips for Stunning Starry Shots
Correcting Star Colors in Orions Belt
When you capture Orions Belt, the three stars – Alnitak, Alnilam, and Mintaka – should pop with vibrant colors. Yet, sometimes, the colors in your photos might not look quite right. Let’s dive into how you can correct star colors to make your images truly shine.
Identifying Color Issues in Star Photos
Before you begin with color correction, you need to identify the color issues in your star photos. Here are some common problems you might encounter:
- Color Casts: A color cast is an unwanted tint of color that affects the entire image. It can make your stars look off-color.
- Incorrect White Balance: If the white balance is off, your stars might not appear their true colors.
- Saturation Problems: Sometimes, the colors might be too dull or too vibrant, making the stars look unnatural.
To spot these issues, you can:
- Compare your image with reference photos of Orions Belt.
- Use histogram tools to check the color distribution in your image.
Using Color Correction Tools
Once you’ve identified the color issues, it’s time to correct them using various tools. Heres a step-by-step guide on how to do it:
- White Balance Adjustment: Adjust the white balance to correct any color casts. Most photo editing software has a white balance tool. You can use the eyedropper tool to select a neutral area in your image to set the correct white balance.
- Color Balance Tool: Use the color balance tool to adjust the colors in your image. This tool allows you to tweak the shadows, midtones, and highlights separately, giving you more control over the colors.
- Hue/Saturation Adjustment: If the colors are too dull or too vibrant, use the hue/saturation tool to adjust them. Increase the saturation to make the colors pop or decrease it to make them look more natural.
- Selective Color Adjustment: This tool allows you to adjust specific colors in your image. You can use it to tweak the colors of the stars without affecting the rest of the image.
Heres a table summarizing the steps:
| Step | Tool | Purpose |
|---|---|---|
| White Balance Adjustment | White Balance Tool | Correct color casts |
| Color Balance Adjustment | Color Balance Tool | Adjust colors in shadows, midtones, and highlights |
| Hue/Saturation Adjustment | Hue/Saturation Tool | Adjust overall color saturation |
| Selective Color Adjustment | Selective Color Tool | Tweak specific colors |
Achieving Natural Star Colors
Achieving natural star colors is crucial to making your image look realistic. Here are some tips to help you:
- Use Reference Images: Compare your image with reference photos of Orions Belt to get an idea of the natural colors of the stars.
- Avoid Over-Saturation: While it’s tempting to crank up the saturation to make the colors pop, it can make the stars look unnatural. Aim for a balance between vibrant and natural colors.
- Check the Histograms: Use the histogram tools to check the color distribution in your image. A well-balanced histogram can help you achieve natural colors.
Enhancing Orions Belt in Astrophotography: Post-Processing Techniques
Capturing Orions Belt is just the first step. Post-processing is where the magic happens. Lets explore some techniques to enhance your images and make the stars and surrounding nebulosity stand out.
Noise Reduction
Astrophotography often involves long exposure times, which can introduce noise into your images. Reducing noise is essential to bring out the details in Orions Belt. Heres how you can do it:
- Use Noise Reduction Tools: Most photo editing software has noise reduction tools. Use these tools to reduce the noise in your image. Be careful not to overdo it, as it can make the image look soft.
- Stack Multiple Images: Stacking multiple images can help reduce noise. By combining several images, you can average out the noise and bring out the details.
Contrast Enhancement
Enhancing the contrast can make the stars in Orions Belt stand out. Here are some techniques to enhance contrast:
- Use Curves Adjustment: The curves tool allows you to adjust the contrast in your image. You can use it to increase the contrast in the midtones, making the stars pop.
- Levels Adjustment: The levels tool allows you to adjust the brightness and contrast of your image. Use it to set the black and white points, enhancing the overall contrast.
Heres a table summarizing the contrast enhancement techniques:
| Technique | Tool | Purpose |
|---|---|---|
| Curves Adjustment | Curves Tool | Increase contrast in midtones |
| Levels Adjustment | Levels Tool | Set black and white points |
Highlighting Surrounding Nebulosity
The surrounding nebulosity, including the Flame Nebula and the Horsehead Nebula, can add a lot of interest to your image. Heres how you can highlight them:
- Use Masking Techniques: Use masking techniques to selectively enhance the nebulosity without affecting the stars. You can use the brush tool to paint over the areas you want to enhance.
- Adjust Brightness and Contrast: Use the brightness and contrast tools to bring out the details in the nebulosity. Be careful not to overdo it, as it can make the image look unnatural.
Balancing Brightness
Balancing the brightness is crucial to maintaining a natural look while making the image visually striking. Here are some tips to help you:
- Use the Histogram: Check the histogram to ensure that the brightness is well-balanced. Avoid clipping the highlights and shadows.
- Use Gradual Adjustments: Make gradual adjustments to the brightness to avoid making the image look unnatural.
Highlighting Nebulosity Around Orions Belt
Orions Belt is a treasure trove for astrophotographers. With its stunning trio of stars—Alnitak, Alnilam, and Mintaka—this celestial feature is a sight to behold. But capturing its true beauty doesn’t end with the click of a camera. Post-processing is where the magic happens, especially when it comes to highlighting the nebulosity around Orions Belt. Lets dive into some techniques that will make your images pop.
Recognizing Nebulosity Features
Before you start tweaking your images, it’s vital to understand what youre looking at. The nebulosity around Orions Belt includes the Flame Nebula and the Horsehead Nebula. These are faint but stunning features that can add a whole new dimension to your photos.
Flame Nebula: This bright nebula is located near Alnitak. It has a fiery appearance, hence the name. Youll want to bring out its intricate details without washing out the surrounding stars.
Horsehead Nebula: Found near Alnitak as well, this nebula gets its name from its distinctive shape. Its a dark nebula, which means its a bit trickier to highlight. But with the right techniques, you can make it stand out beautifully.
Techniques to Enhance Nebulosity
Now that you know what to look for, let’s get into the nitty-gritty of enhancing these features.
Noise Reduction
Noise can be a real nuisance in astrophotography. It can obscure the delicate details of nebulosity. Heres how you can tackle it:
Software: Tools like Adobe Photoshop and Lightroom have excellent noise reduction features. You can also use specialized astrophotography software like PixInsight.
Steps:
- Open your image in your chosen software.
- Zoom in to get a good look at the noise.
- Adjust the noise reduction sliders until you see an improvement. Be careful not to overdo it, as this can make your image look unnatural.
Contrast Enhancement
Contrast is crucial for making nebulosity stand out. You want to enhance the difference between the bright stars and the faint nebulae.
Steps:
- Duplicate your image layer to work non-destructively.
- Use the Curves tool to adjust the contrast. Pull the curve up in the highlights and down in the shadows.
- Apply a mask to selectively enhance the areas with nebulosity. This helps in keeping the stars looking natural.
Star Color Correction
The stars in Orions Belt have distinct colors. Alnitak is blue, Alnilam is blue-white, and Mintaka is also blue. Correcting the star colors can make your image more vibrant and realistic.
Steps:
- Select the stars using the Color Range tool.
- Adjust the Hue/Saturation to bring out their natural colors.
- Use the Selective Color tool to fine-tune the hues.
Highlighting the Flame Nebula and Horsehead Nebula
These nebulae are the crown jewels of Orions Belt. Heres how you can make them shine:
Flame Nebula:
- Use the Lasso tool to select the Flame Nebula.
- Feather the selection to blend the edges.
- Increase the brightness and contrast within the selection.
Horsehead Nebula:
- Select the Horsehead Nebula using the Lasso tool.
- Feather the selection to avoid harsh edges.
- Increase the contrast to make the dark nebula stand out against the brighter background.

Balancing Brightness in Orions Belt Photos
Importance of Brightness Balance
When you capture the night sky, especially Orions Belt, you want your photos to be breathtaking. The three stars—Alnitak, Alnilam, and Mintaka—are dazzling. But if the brightness isn’t balanced, your photo can lose its charm. Brightness balance is crucial because it helps in:
- Highlighting Details: You want to see the stars and the surrounding nebulosity clearly.
- Enhancing Colors: Proper balance makes the stars’ colors more vivid.
- Reducing Glare: Too much brightness can wash out the details.
Imagine your photo as a painting. If one part is too bright, it distracts from the beauty of the whole scene. Balancing brightness helps you create a harmonious and striking image.
Tools for Adjusting Brightness
To achieve the perfect brightness balance, you need the right tools. Here are some you can use:
Photoshop
Photoshop is a powerful tool for adjusting brightness. Heres how you can use it:
- Curves Adjustment: Go to Image > Adjustments > Curves. This tool allows you to fine-tune the brightness and contrast. You can create a gentle S-curve to enhance the midtones without blowing out the highlights. | Step | Action | |——|——–| | 1 | Open your image in Photoshop. | | 2 | Go to Image > Adjustments > Curves. | | 3 | Create a gentle S-curve to enhance midtones. |
- Levels Adjustment: Go to Image > Adjustments > Levels. This tool helps you adjust the brightness by setting the black, gray, and white points. Move the sliders to balance the brightness. | Step | Action | |——|——–| | 1 | Open your image in Photoshop. | | 2 | Go to Image > Adjustments > Levels. | | 3 | Move the sliders to set black, gray, and white points. |
Lightroom
Lightroom is another excellent tool for brightness adjustment. Heres how to use it:
- Exposure Slider: This slider helps you adjust the overall brightness of your image. Be careful not to overdo it. | Step | Action | |——|——–| | 1 | Open your image in Lightroom. | | 2 | Go to the Develop module. | | 3 | Use the Exposure slider to adjust brightness. |
- Highlights and Shadows Sliders: These sliders help you fine-tune the brightness of the highlights and shadows separately. This can help you bring out details in both the bright and dark areas. | Step | Action | |——|——–| | 1 | Open your image in Lightroom. | | 2 | Go to the Develop module. | | 3 | Use the Highlights and Shadows sliders to fine-tune brightness. |
Maintaining Natural Look While Enhancing
Enhancing your photos is essential, but you also want to maintain a natural look. Here are some tips to help you achieve that:
Gentle Adjustments
When adjusting brightness, make gentle changes. Small tweaks can make a big difference without making the photo look unnatural.
| Tip | Description |
|---|---|
| 1 | Make small, incremental changes. |
| 2 | Avoid drastic adjustments. |
Use Layer Masks
In Photoshop, you can use layer masks to apply adjustments selectively. This helps you enhance specific areas without affecting the whole image.
| Step | Action |
|---|---|
| 1 | Create an adjustment layer. |
| 2 | Add a layer mask. |
| 3 | Use a soft brush to apply the adjustment selectively. |
Unlock the Beauty of Orions Belt: Post-Processing Tips for Stunning Starry Shots
Making Orions Belt Stand Out
Youve captured Orions Belt, one of the most recognizable parts of the night sky. Now, its time to make those stars pop and reveal the hidden beauty of the surrounding nebulas. Lets dive into some post-processing techniques that will transform your raw images into stunning works of art.
Focusing on Key Stars: Alnitak, Alnilam, and Mintaka
Orions Belt consists of three bright stars: Alnitak, Alnilam, and Mintaka. Each of these stars has its own unique characteristics and colors. Enhancing these stars will make your image more captivating.
1. Isolating the Stars:
- Use a selection tool to isolate Alnitak, Alnilam, and Mintaka.
- Apply a slight feather to the selection to avoid harsh edges.
2. Enhancing Star Colors:
- Adjust the saturation and hue to bring out the natural colors of each star.
- Alnitak often appears blue, Alnilam is a bright white, and Mintaka has a subtle blue hue.
- Use a color balance tool to fine-tune the colors.
3. Increasing Brightness and Contrast:
- Carefully increase the brightness and contrast of the selected stars.
- Avoid overexposing the stars; this will help maintain their natural look.
Using Layers to Highlight Stars
Layers are your best friend in post-processing. They allow you to make adjustments without affecting the entire image. Heres how you can use layers to highlight Orions Belt.
1. Creating Layers:
- Duplicate your original image layer.
- Work on the duplicated layer to preserve the original image.
2. Applying Noise Reduction:
- Use a noise reduction filter on the duplicated layer.
- Focus on reducing noise around the stars while keeping their sharpness intact.
3. Enhancing Nebulosity:
- Create a new layer for the Flame Nebula and the Horsehead Nebula.
- Use a brush tool with a low opacity to paint over the nebulas.
- Adjust the layers blending mode to “Screen” or “Lighten” to enhance the nebulosity without overexposing it.
4. Balancing Brightness:
- Create a new adjustment layer for brightness and contrast.
- Make subtle adjustments to ensure the stars stand out without losing detail in the surrounding areas.