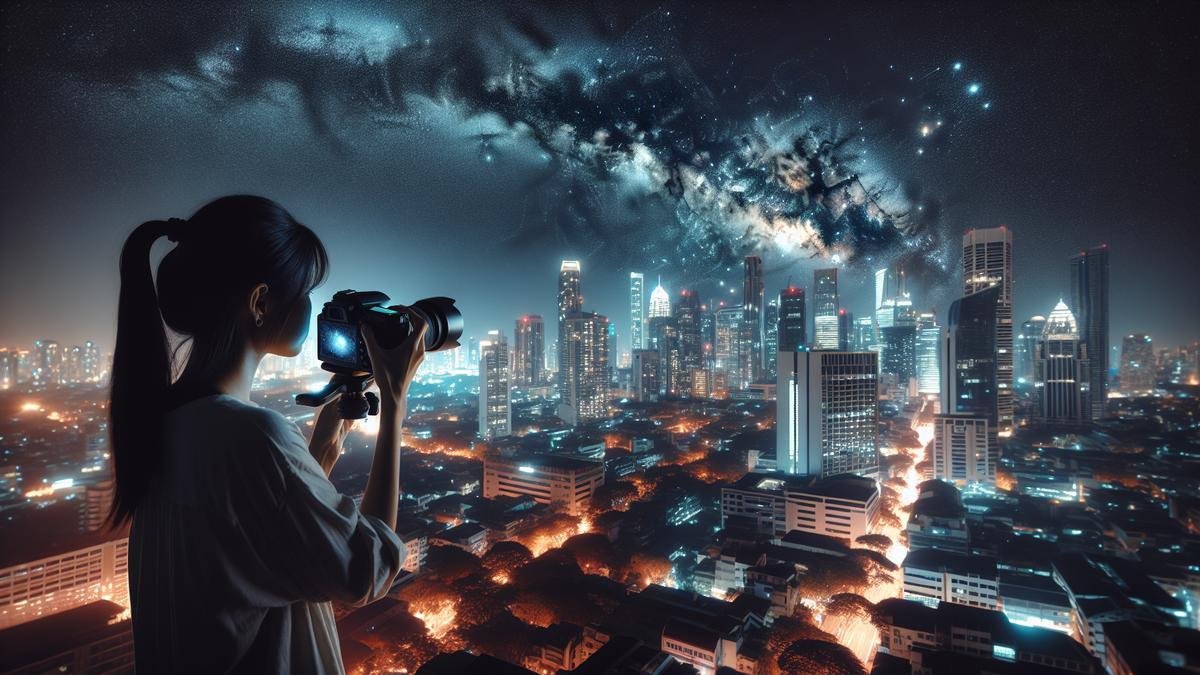
Astrophotography in Urban Areas: Overcoming Light Pollution can seem like a daunting task, but it’s definitely possible with the right tips and tricks. Whether you’re a night-sky newbie or a seasoned photographer, understanding how light pollution impacts your shots and choosing the right gear are crucial. From mastering techniques to reduce unwanted light to figuring out the best spots and ideal times to shoot, this guide has got you covered. Get ready to explore everything from the top cameras and lenses to use, to post-processing magic that will bring out the best in your urban astrophotography!
Key Takeaways
- Use a tripod for steady shots
- Pick the right time of night
- Use filters to reduce light pollution
- Find the darkest spot in your area
- Edit photos to enhance stars

Understanding Light Pollution
What Causes Light Pollution
Light pollution is the bane of any urban astrophotographer’s existence. It’s like trying to hear a whisper in a crowded room. But what exactly causes this pesky interference?
Streetlights are a major culprit. They spill light in all directions, including up into the sky. Then there are billboards and commercial signs that glow brightly through the night. Even residential lighting contributes, with porch lights and security systems adding to the sky’s glow.
In essence, any artificial light that isn’t properly shielded can scatter photons into the atmosphere. This scattering creates a bright background, making it difficult to capture the faint light from stars and other celestial objects.
Types of Light Pollution
Understanding the types of light pollution can help you develop strategies to combat it. Here are the main types:
Skyglow
Skyglow is the brightening of the night sky over populated areas. It’s the most pervasive form of light pollution and can be seen from miles away. Even in the countryside, you might notice a faint glow on the horizon from a distant city.
Glare
Glare occurs when bright lights shine directly into your eyes, reducing visibility. For astrophotographers, this can be particularly troublesome, as it can cause lens flare and reduce the contrast of your images.
Light Trespass
Light trespass is when unwanted artificial light spills over into areas where it’s not needed. For instance, a neighbor’s porch light shining into your backyard can ruin your night sky observation.
Clutter
Clutter refers to the excessive grouping of bright lights, often found in urban areas. Think of Times Square or Las Vegas. This type of light pollution can create confusing and overwhelming scenes, making it hard to focus on specific celestial objects.
How Light Pollution Affects Astrophotography
Light pollution impacts astrophotography in several ways. First, it reduces the contrast between celestial objects and the sky, making it difficult to capture faint stars, nebulae, and galaxies. Second, it introduces noise into your images, which can obscure details and make post-processing more challenging.
Contrast Reduction
When the sky is bright, the contrast between the stars and the background diminishes. This makes it harder to capture the intricate details of celestial objects. Even with advanced cameras and lenses, the reduced contrast can limit the quality of your photos.
Increased Noise
Light pollution adds unwanted light to your images, which can appear as noise. This noise can obscure the fine details of celestial objects and make your images look grainy. Post-processing can help, but it’s often a meticulous and time-consuming task.
Tips and Strategies for Overcoming Light Pollution
Use Light Pollution Filters
One of the most effective ways to combat light pollution is to use specialized filters. These filters are designed to block out specific wavelengths of light associated with artificial lighting, allowing the natural light from celestial objects to pass through. Check out the best filters for enhancing your astrophotography shots.
Choose the Right Gear
Selecting the right gear can make a significant difference. Consider using cameras with high ISO capabilities and lenses with wide apertures to capture more light. You might find this guide to essential lenses for capturing the night sky helpful.
Plan Your Shoots
Timing is crucial. Aim to shoot during the new moon phase when the sky is darkest. Additionally, try to shoot during the late hours of the night when most artificial lights are turned off. Advanced planning tools can be invaluable; explore using software for advanced astrophotography planning.
Find Darker Locations
Even in urban areas, you can find pockets of darkness. Parks, rooftops, and other elevated areas can offer some respite from street-level lighting. Use apps and websites that track light pollution to find the best spots in your city.
Post-Processing Techniques
Post-processing can help mitigate the effects of light pollution. Techniques like stacking multiple exposures and using software to reduce noise can enhance your images. For more on this, check out combining and stacking images for astrophotography.
Shield Your Telescope
If you’re using a telescope, consider using a light shroud or dew shield to block stray light. This can help improve the contrast and clarity of your observations.
Stay Steady
A stable setup is crucial for long-exposure astrophotography. Invest in a sturdy tripod and consider using a tracking mount to follow celestial objects as they move across the sky. For more stability tips, explore tripods for astrophotography: stability and precision.
Equipment Recommendations
Here’s a handy table of recommended equipment to help you get started:
| Equipment Type | Recommended Options |
|---|---|
| Cameras | Top 10 Cameras for Astrophotography in 2024 |
| Lenses | Essential Lenses for Capturing the Night Sky |
| Filters | Best Filters for Enhancing Your Astrophotography Shots |
| Tripods | Tripods for Astrophotography: Stability and Precision |
| Tracking Mounts | Guide to Astrophotography Mounts and Tracking Systems |
| Software | Best Software for Editing Astrophotography Images |
Additional Tips
Use a Star Tracker
A star tracker can significantly improve your long-exposure shots by compensating for the Earth’s rotation. This allows you to capture sharp, detailed images of celestial objects without the blurring that can occur with longer exposures. Learn more about using star trackers for perfect astrophotography.
Experiment with High ISO
While high ISO settings can introduce noise, they also allow you to capture more light in shorter exposures. This can be particularly useful in urban environments where light pollution limits the effectiveness of long exposures. For tips on managing high ISO settings, check out astrophotography with high ISO: tips and tricks.
Try Different Angles
Sometimes, simply changing your angle can help reduce the impact of light pollution. Try to position yourself so that bright lights are behind you, and use natural features like trees or buildings to block out unwanted light.
Use a Remote Shutter Release
A remote shutter release can prevent camera shake during long exposures, ensuring your images remain sharp. This is especially important when shooting in urban areas where even minor vibrations can affect your shots.
Overcoming Challenges
Astrophotography in urban areas comes with its own set of challenges, but with the right strategies, you can still capture stunning images of the night sky.
Dealing with Weather Conditions
Urban areas often have more air pollution, which can affect visibility. Check the weather forecast and aim to shoot on clear nights with low humidity.
Handling Equipment
Urban environments can be tough on your gear. Make sure to protect your equipment from dust and moisture, and always have a backup plan in case of unexpected issues. For a comprehensive list of essential gear, explore must-have accessories for every astrophotographer.
Safety Considerations
Safety is paramount when shooting at night in urban areas. Always be aware of your surroundings and consider bringing a friend along for added security.
Advanced Techniques
Combining Multiple Exposures
Combining multiple exposures can help you capture more detail and reduce noise. This technique involves taking several shorter exposures and stacking them together in post-processing. For a detailed guide, check out combining and stacking images for astrophotography.
Using Software for Post-Processing
Post-processing software can be a game-changer for urban astrophotographers. Programs like Photoshop and Lightroom offer tools to reduce noise, enhance contrast, and bring out the details in your images. For beginners, explore using Lightroom for astrophotography.
Creating HDR Images
High Dynamic Range (HDR) imaging can help you capture a wider range of light and detail. This involves taking multiple exposures at different settings and combining them to create a single image with enhanced detail. Learn more about creating HDR astrophotography images.
Choosing the Right Equipment
Best Cameras for Urban Astrophotography
When youre diving into the intricate world of astrophotography in urban areas, selecting the right camera is crucial. The battle against light pollution starts with your gear. High ISO performance and low noise levels are your best friends here.
Top Cameras for Urban Astrophotography
| Camera Model | Key Features | Price Range |
|---|---|---|
| Canon EOS Ra | Full-frame sensor, 30x zoom | $2,500 – $3,000 |
| Nikon D850 | 45.7 MP, excellent low-light performance | $2,800 – $3,200 |
| Sony A7 III | Full-frame, 10 fps continuous shooting | $1,800 – $2,200 |
| Fujifilm X-T4 | APS-C sensor, in-body stabilization | $1,500 – $1,700 |
Why These Cameras?
- Canon EOS Ra: Specifically designed for astrophotography, this camera excels at capturing the faintest stars.
- Nikon D850: Its high resolution and dynamic range make it a versatile choice for both deep-sky and wide-field shots.
- Sony A7 III: Known for its excellent noise control, its perfect for long exposures in light-polluted areas.
- Fujifilm X-T4: Offers great value with its in-body stabilization and robust build, making it easier to handle in urban environments.
For more detailed comparisons between DSLRs and mirrorless options, check out this comprehensive guide.
Essential Lenses for Night Sky Shots
Your lens choice can make or break your urban astrophotography experience. Wide apertures and short focal lengths are the go-to features.
Must-Have Lenses
| Lens | Focal Length | Aperture | Price Range |
|---|---|---|---|
| Rokinon 14mm f/2.8 | 14mm | f/2.8 | $300 – $400 |
| Sigma 35mm f/1.4 Art | 35mm | f/1.4 | $800 – $900 |
| Canon EF 24mm f/1.4L II | 24mm | f/1.4 | $1,500 – $1,600 |
| Nikon AF-S NIKKOR 20mm f/1.8G | 20mm | f/1.8 | $700 – $800 |
Why These Lenses?
- Rokinon 14mm f/2.8: Affordable and sharp, perfect for wide-field shots.
- Sigma 35mm f/1.4 Art: Excellent for capturing more detailed sections of the sky.
- Canon EF 24mm f/1.4L II: High-quality optics and wide aperture for light-gathering.
- Nikon AF-S NIKKOR 20mm f/1.8G: Great balance of focal length and aperture for versatile shooting.
For more insights on selecting the right lenses, explore this detailed article.
Filters for Urban Astrophotography
Filters can be a game-changer in urban settings. They help mitigate the effects of light pollution.
Recommended Filters
| Filter Type | Purpose | Price Range |
|---|---|---|
| Light Pollution Reduction (LPR) | Reduces city lights | $100 – $200 |
| Neutral Density (ND) | Manages exposure | $50 – $150 |
| UV/IR Cut | Enhances clarity | $30 – $70 |
For a deeper dive into how filters can enhance your shots, check out this comprehensive guide.
Tripods and Stability Tips
Stability is paramount in astrophotography. Even the slightest shake can ruin a shot.
Top Tripods for Urban Astrophotography
| Tripod Model | Key Features | Price Range |
|---|---|---|
| Manfrotto Befree Advanced | Compact, lightweight | $150 – $200 |
| Gitzo Series 1 Traveler | High stability, lightweight | $900 – $1,000 |
| Vanguard Alta Pro 263AB | Multi-angle central column | $150 – $200 |
| ZOMEI Z818 | Budget-friendly, sturdy | $80 – $100 |
Stability Tips
- Use a Remote Shutter Release: Prevents camera shake during long exposures.
- Weight Your Tripod: Hang a weight from the center column for added stability.
- Choose Solid Ground: Avoid soft surfaces that can shift.
- Use a Bubble Level: Ensures your tripod is perfectly level.
For more tips on achieving stability, refer to this detailed guide.
Overcoming Light Pollution
Light Pollution Filters
When shooting in urban areas, light pollution filters are indispensable. These filters selectively block wavelengths of light emitted by streetlights, enhancing the contrast of your celestial subjects.
Top Light Pollution Filters
| Filter | Type | Price Range |
|---|---|---|
| Hoya Red Intensifier | LPR | $80 – $100 |
| Optolong L-Pro | LPR | $200 – $250 |
| Astronomik CLS | Clip-in | $120 – $150 |
| IDAS LPS-D1 | LPR | $200 – $250 |
Advanced Techniques
Combining Multiple Exposures
Combining multiple exposures can significantly improve the quality of your images. This technique involves taking several short exposures and stacking them to reduce noise and enhance detail.
Steps for Combining Exposures
- Take Multiple Shots: Capture several images of the same scene.
- Use Software: Programs like DeepSkyStacker or Photoshop can align and stack your images.
- Adjust Levels: Fine-tune the brightness and contrast to bring out details.
For a comprehensive guide on this technique, explore this detailed article.
Using Star Trackers
Star trackers are another powerful tool for urban astrophotography. They compensate for the Earth’s rotation, allowing you to take longer exposures without star trails.
Recommended Star Trackers
| Tracker | Key Features | Price Range |
|---|---|---|
| Sky-Watcher Star Adventurer | Portable, user-friendly | $300 – $350 |
| iOptron SkyGuider Pro | High precision, compact | $400 – $450 |
| Vixen Polarie | Lightweight, easy setup | $400 – $450 |
For more information on star trackers, check out this in-depth guide.
Post-Processing Tips
Post-processing is where you can truly make your images shine. Software like Photoshop and Lightroom offer powerful tools to enhance your astrophotography.
Essential Post-Processing Steps
- Noise Reduction: Use tools to minimize noise without losing detail.
- Contrast Adjustment: Increase contrast to make stars pop.
- Color Correction: Adjust colors to bring out the natural hues of celestial objects.
- Sharpening: Apply sharpening to enhance fine details.
For a beginner-friendly guide to post-processing, refer to this article.
Portable Power Solutions
When youre out in the field, having reliable power is essential. Portable power solutions can keep your gear running all night.
Top Portable Power Solutions
| Power Source | Key Features | Price Range |
|---|---|---|
| Goal Zero Yeti 200X | Lightweight, versatile | $300 – $350 |
| Jackery Explorer 240 | High capacity, portable | $200 – $250 |
| Anker Powerhouse 200 | Compact, fast charging | $200 – $250 |
For more options, explore this comprehensive guide.

Techniques to Reduce Light Pollution
Astrophotography in urban areas can be a challenge due to the pervasive issue of light pollution. However, with the right techniques and tools, you can still capture stunning night sky images. Here are some strategies to help you overcome the challenges of light pollution.
Using Light Pollution Filters
Light pollution filters are specifically designed to block out the wavelengths of light most commonly emitted by streetlights and other artificial sources. These filters can make a significant difference in the quality of your astrophotography.
Types of Light Pollution Filters
| Filter Type | Description |
|---|---|
| Broadband Filters | These filters block out a wide range of wavelengths, making them versatile for various types of astrophotography. |
| Narrowband Filters | These filters are more selective, blocking out specific wavelengths and allowing only the light from celestial objects to pass through. |
| CLS (City Light Suppression) Filters | Designed to reduce the effects of streetlights and other urban lighting, these filters are perfect for city-based astrophotographers. |
How to Use Light Pollution Filters
- Attach the Filter: Most light pollution filters can be screwed onto the front of your lens or placed in a filter holder.
- Adjust Settings: You may need to tweak your camera settings to compensate for the reduced light entering the lens.
- Test and Adjust: Take a few test shots to see how the filter affects your images and make any necessary adjustments.
Post-Processing Tips
Post-processing is an essential part of astrophotography, especially when dealing with light pollution. With the right techniques, you can significantly improve the quality of your images.
Adjusting Camera Settings
Before diving into post-processing, it’s crucial to get your camera settings right. Here are some tips:
| Setting | Recommended Value |
|---|---|
| ISO | Start with a high ISO (e.g., 1600-3200) but be mindful of noise. |
| Aperture | Use a wide aperture (e.g., f/2.8) to allow more light to enter the lens. |
| Shutter Speed | Use a long exposure (e.g., 20-30 seconds) to capture more light. |
| White Balance | Set to daylight or custom to match the natural colors of the night sky. |
Basic Post-Processing Steps
- Noise Reduction: Use software to reduce noise, which is often exacerbated by high ISO settings.
- Contrast and Brightness: Adjust the contrast and brightness to bring out the details in the night sky.
- Color Correction: Correct any color casts caused by light pollution.
- Stacking Images: Combine multiple exposures to reduce noise and enhance detail.
For more advanced post-processing techniques, consider exploring resources on how to reduce noise in astrophotography photos.
Advanced Post-Processing Techniques
If you’re looking to take your post-processing skills to the next level, here are some advanced techniques:
| Technique | Description |
|---|---|
| HDR Imaging | Combine multiple exposures with different settings to create a high dynamic range image. |
| Star Stacking | Stack multiple images to reduce noise and improve detail. |
| Color Enhancement | Use software to enhance the colors of stars and other celestial objects. |
For a deeper dive into these techniques, check out combining and stacking images for astrophotography.
Software Recommendations
Using the right software can make a world of difference in your post-processing workflow. Here are some popular options:
| Software | Features |
|---|---|
| Adobe Photoshop | Powerful editing tools for advanced users. |
| Lightroom | User-friendly interface with essential editing tools. |
| DeepSkyStacker | Specializes in stacking multiple images for astrophotography. |
Explore more about the best software for editing astrophotography images to find the right fit for your needs.
Finding the Best Urban Locations
When you’re diving into astrophotography in urban areas, the biggest challenge you’ll face is light pollution. But don’t worry, there are still plenty of strategies to capture stunning night sky images even in the heart of the city. Let’s explore some of the best urban locations and tips to overcome light pollution.
Rooftops and High Places
Rooftops and high places can be your best friends. The higher you go, the less light pollution you encounter from streetlights and buildings. Plus, being elevated gives you a wider view of the sky.
- Apartment rooftops: If you live in or have access to a high-rise building, the rooftop can be an excellent spot. Just make sure you have permission to be there.
- Parking garages: These often have open rooftops that provide a clear view of the sky. They are usually less crowded at night.
- Hills and elevated parks: If your city has any natural elevations, these can be great spots to set up your gear.
| Location | Pros | Cons |
|---|---|---|
| Apartment Rooftops | High elevation, accessible | Permission needed, safety considerations |
| Parking Garages | Open view, less crowded at night | Light from nearby cars, security concerns |
| Hills/Elevated Parks | Natural elevation, wide sky view | May be far from home, uneven ground |
Parks and Open Spaces
Parks and open spaces offer a bit of a refuge from the overwhelming lights of the city. Heres how you can make the most of these areas:
- Large city parks: These often have areas that are less lit, especially if they have open fields.
- Sports fields: When not in use, these can provide large, dark spaces. Just avoid nights when games or practices are scheduled.
- Community gardens: These are usually quieter and have fewer lights, making them a good option.
| Location | Pros | Cons |
|---|---|---|
| Large City Parks | Less lit areas, open fields | May have some light pollution |
| Sports Fields | Large, dark spaces | Scheduled events, accessibility |
| Community Gardens | Quiet, fewer lights | Smaller area, may close at night |

Timing Your Shots
Best Times of Night for Astrophotography
If you’re diving into astrophotography in urban areas, timing is your best friend. Light pollution is one of the biggest hurdles you’ll face. However, the night sky still holds its wonders, even amidst city lights. The key is to capture your shots during the darkest hours of the night.
Optimal Hours:
| Time | Description |
|---|---|
| 10 PM – 12 AM | Early night, some light pollution from city lights. |
| 12 AM – 2 AM | City lights dim, better visibility of stars. |
| 2 AM – 4 AM | Best time, minimal light pollution, clearer skies. |
| 4 AM – 5 AM | Early dawn, light pollution starts increasing. |
Focusing on the window between 2 AM and 4 AM can significantly improve your chances of capturing clearer, more detailed images. The city’s glow subsides, and the stars get their time to shine.
Planning Around the Moon Phases
The moon, while beautiful, can be a double-edged sword for astrophotographers. Its brightness can wash out the stars, making it challenging to get that perfect shot.
Moon Phases and Their Impact:
| Moon Phase | Impact on Astrophotography |
|---|---|
| New Moon | Best time, minimal light interference. |
| Waxing Crescent | Good, low moonlight. |
| First Quarter | Moderate, some interference. |
| Waxing Gibbous | Challenging, increasing moonlight. |
| Full Moon | Worst time, high light interference. |
| Waning Gibbous | Challenging, decreasing moonlight. |
| Last Quarter | Moderate, some interference. |
| Waning Crescent | Good, low moonlight. |
Planning your shoots around the new moon phase can be a game-changer. The absence of moonlight allows the stars to stand out against the dark sky, providing a perfect backdrop for your astrophotography.
Using Weather Apps for Clear Skies
Clear skies are the canvas for your astrophotography. Clouds and fog can obscure your view, making it crucial to check the weather before heading out.
Weather Apps to Consider:
| App Name | Features |
|---|---|
| Clear Outside | Detailed cloud cover predictions, light pollution maps. |
| Dark Sky | Accurate weather forecasts, precipitation alerts. |
| Weather Underground | Hyper-local weather updates, satellite imagery. |
| SkySafari | Astronomy-focused weather predictions, star maps. |
Using these apps, you can pinpoint the best nights for clear skies, ensuring that your efforts aren’t in vain. Plus, some of these apps also provide light pollution maps, helping you find the darkest spots in your urban area.
Overcoming Light Pollution
Filters and Lenses
Light pollution can be a nightmare, but with the right gear, you can mitigate its effects. Filters and lenses play a crucial role in enhancing your astrophotography.
Types of Filters:
| Filter Type | Benefit |
|---|---|
| Light Pollution Filters | Reduces city light interference. |
| Narrowband Filters | Isolates specific wavelengths, enhances nebulae and galaxies. |
| UV/IR Cut Filters | Blocks ultraviolet and infrared light, improves clarity. |
Investing in quality filters can significantly reduce the impact of light pollution, allowing you to capture the night sky in all its glory. Additionally, choosing the right lenses can make a world of difference. Wide-angle lenses are particularly effective for astrophotography, offering a broader field of view and capturing more of the sky.
Choosing the Right Location
Even in urban areas, some spots are better than others for astrophotography. Finding the right location can make a significant difference in your results.
Ideal Locations:
| Location Type | Benefits |
|---|---|
| Parks | Open spaces, less light interference. |
| Rooftops | Elevated position, clearer view of the sky. |
| Outskirts | Away from the city center, reduced light pollution. |
| Beaches | Open horizon, minimal light interference. |
Scouting for these locations can help you find the darkest spots in your urban area. Even a slight reduction in light pollution can enhance the quality of your astrophotography.
Using Star Trackers
Star trackers are indispensable tools for astrophotographers. They allow your camera to follow the stars’ movement, enabling longer exposures without star trails.
Popular Star Trackers:
| Tracker Model | Features |
|---|---|
| Sky-Watcher Star Adventurer | Compact, versatile, easy to use. |
| iOptron SkyGuider Pro | High precision, suitable for heavier cameras. |
| Vixen Polarie | Lightweight, portable, user-friendly. |
Using a star tracker can significantly improve your astrophotography, allowing you to capture sharper, more detailed images of the night sky.
Mastering Long Exposure
Camera Settings
Long exposure is a fundamental technique in astrophotography. It allows your camera to capture more light, revealing stars and celestial objects that are invisible to the naked eye.
Recommended Camera Settings:
| Setting | Value |
|---|---|
| ISO | 1600-3200 |
| Aperture | f/2.8 or lower |
| Shutter Speed | 20-30 seconds |
| White Balance | Tungsten or Daylight |
These settings provide a good starting point, but you’ll need to experiment to find the optimal combination for your specific conditions.
Noise Reduction
Long exposures can introduce noise into your images, but there are ways to mitigate this.
Noise Reduction Techniques:
| Technique | Description |
|---|---|
| In-Camera Noise Reduction | Many cameras have built-in noise reduction features. |
| Stacking Multiple Exposures | Combines several images to reduce noise. |
| Post-Processing Software | Tools like Adobe Lightroom or Photoshop can help. |
Using these techniques, you can significantly reduce noise, resulting in cleaner, more detailed astrophotography images.
Post-Processing
Essential Software
Post-processing is where your astrophotography truly comes to life. The right software can enhance your images, bringing out details that were invisible in the raw shots.
Popular Software:
| Software | Features |
|---|---|
| Adobe Lightroom | User-friendly, excellent for basic adjustments. |
| Adobe Photoshop | Advanced editing capabilities, extensive tools. |
| DeepSkyStacker | Specializes in stacking multiple exposures. |
| PixInsight | Comprehensive tools for astrophotography. |
Using these tools, you can enhance your astrophotography, bringing out the beauty of the night sky.
Techniques for Enhancing Star Colors
Bringing out the colors of stars can add a new dimension to your astrophotography.
Enhancement Techniques:
| Technique | Description |
|---|---|
| Color Balance Adjustment | Tweaks the color balance to highlight star colors. |
| Saturation Boost | Enhances the vividness of star colors. |
| Selective Color Adjustment | Focuses on specific colors to bring out details. |
Applying these techniques can make your astrophotography more vibrant and visually appealing.
Combining and Stacking Images
Stacking multiple exposures is a powerful technique in astrophotography. It allows you to combine several images, reducing noise and enhancing details.
Steps for Stacking:
| Step | Description |
|---|---|
| Capture Multiple Exposures | Take several shots of the same scene. |
| Align the Images | Use software to align the images. |
| Stack the Images | Combine the aligned images to create a single, detailed image. |
| Post-Process the Stacked Image | Enhance the final image using post-processing software. |
Using these steps, you can create stunning astrophotography images with enhanced detail and reduced noise.
Capturing Stunning Urban Sky Photos
Framing Your Shots
When you’re in the hustle and bustle of a city, capturing the night sky can feel like trying to find a needle in a haystack. But don’t worry, with some tricks up your sleeve, you can still snap some awe-inspiring shots. Start by framing your shots creatively. Use buildings, bridges, or trees to add some urban charm to your celestial captures. This not only makes your photos more interesting but also helps block some of that pesky light pollution.
Key Points for Framing
| Tip | Description |
|---|---|
| Use Leading Lines | Streets, bridges, or even rooftops can guide the viewer’s eye towards the sky. |
| Rule of Thirds | Place the horizon or key elements off-center to create a balanced composition. |
| Foreground Elements | Include statues, streetlights, or even people to add depth and context. |
Combining Cityscapes with Stars
Blending the urban landscape with the night sky can create some truly magical images. Think about how the city lights can complement the stars. You might capture the glow of a skyscraper alongside the twinkle of a distant constellation. This combination can turn a simple photo into a storytelling masterpiece.
Techniques for Combining Cityscapes and Stars
| Technique | Benefit |
|---|---|
| Layering Exposures | Take one shot for the cityscape and another for the stars, then merge them. |
| Using Filters | A light pollution filter can help you capture the stars more clearly. Learn more about the best filters here. |
| Adjusting White Balance | Tweak the white balance to make the stars pop against the city lights. |
Experimenting with Long Exposures
Long exposures are your best friend when it comes to urban astrophotography. They allow you to capture more light, revealing stars that are otherwise invisible to the naked eye. However, long exposures can also amplify light pollution, so you’ll need to experiment to find the sweet spot.
Frequently asked questions
How do you reduce light pollution in urban astrophotography?
Use a light pollution filter. Shoot during new moons. Find the darkest spot in your area. Use a lens hood.
What’s the best time to take astrophotos in a city?
Late at night, after most lights are off. Ideally after midnight. Aim for new moon phases.
Which camera settings work best for Astrophotography in Urban Areas: Overcoming Light Pollution?
Use a wide aperture (f/2.8 or lower). Set ISO between 800-3200. Shutter speed around 10-30 seconds. Experiment for the best results.
Can editing software help with light pollution?
Yes! Use software like Photoshop or Lightroom. Adjust contrast, brightness, and use noise reduction tools. Play with color balance to enhance stars.
Do you need special equipment for urban astrophotography?
A tripod is a must. Use a remote shutter release. A tracking mount can help. Light pollution filters are very useful too.
